Blog

Self-Centering Vise ROI for CNC: Faster Changeovers, Less Labor & Better Repeatability

A practical ROI guide for shops that want shorter setups, less manual indicating, and more repeatable batch changeovers without rebuilding every fixture from scratch.

Published on July 10, 20258 min read
Table of contents
High-Precision 5-Axis Self-Centering Vise
Featured Product

High-Precision 5-Axis Self-Centering Vise

Dual-jaw self-centering vise for 5-axis machining with low backlash, hardened jaws and 52 / 96 mm zero-point compatibility — fast manual or pneumatic clamping.

  • Self-centering, ±0.01 mm typical accuracy
  • Hardened jaws + adjustable backlash
  • 52 mm & 96 mm zero-point compatible
The Nextas Tech Self-Centering Vise operating efficiently on a 5-axis CNC machine, showcasing its precision workholding capabilities.
A Nextas Tech self-centering vise set up for repeatable batch clamping.

Most shops think about ROI only in terms of spindle uptime, but a self-centering vise often pays back in the minutes around the cut: jaw changes, manual indicating, first-part verification, and the hidden time operators spend making the setup feel “safe enough” before cycle start. Those minutes are easy to overlook because they are scattered throughout the day, yet they are exactly where workholding upgrades create measurable gains.

The real question is not whether a self-centering vise is more advanced than a conventional vise. The better question is: does it remove repeatable waste from your current workflow? If the answer is yes, ROI is usually easier to justify than shops expect.

Where Traditional Setups Lose Time

Traditional setups lose time whenever operators must re-establish the centerline from scratch. That may include jaw resets, stock indicating, re-touching offsets, and verifying whether the workpiece is centered well enough to proceed. On repeat jobs, none of that adds value for the customer—it is simply the cost of restoring a condition that should already be controlled by the workholding system.

There is also a quality cost. When two operators rebuild the same setup slightly differently, the first-part correction can move, the amount of stock left for finishing can vary, and the shop starts compensating with extra checks. In that situation, “more careful setup” is not a scalable answer. Better repeatability is.

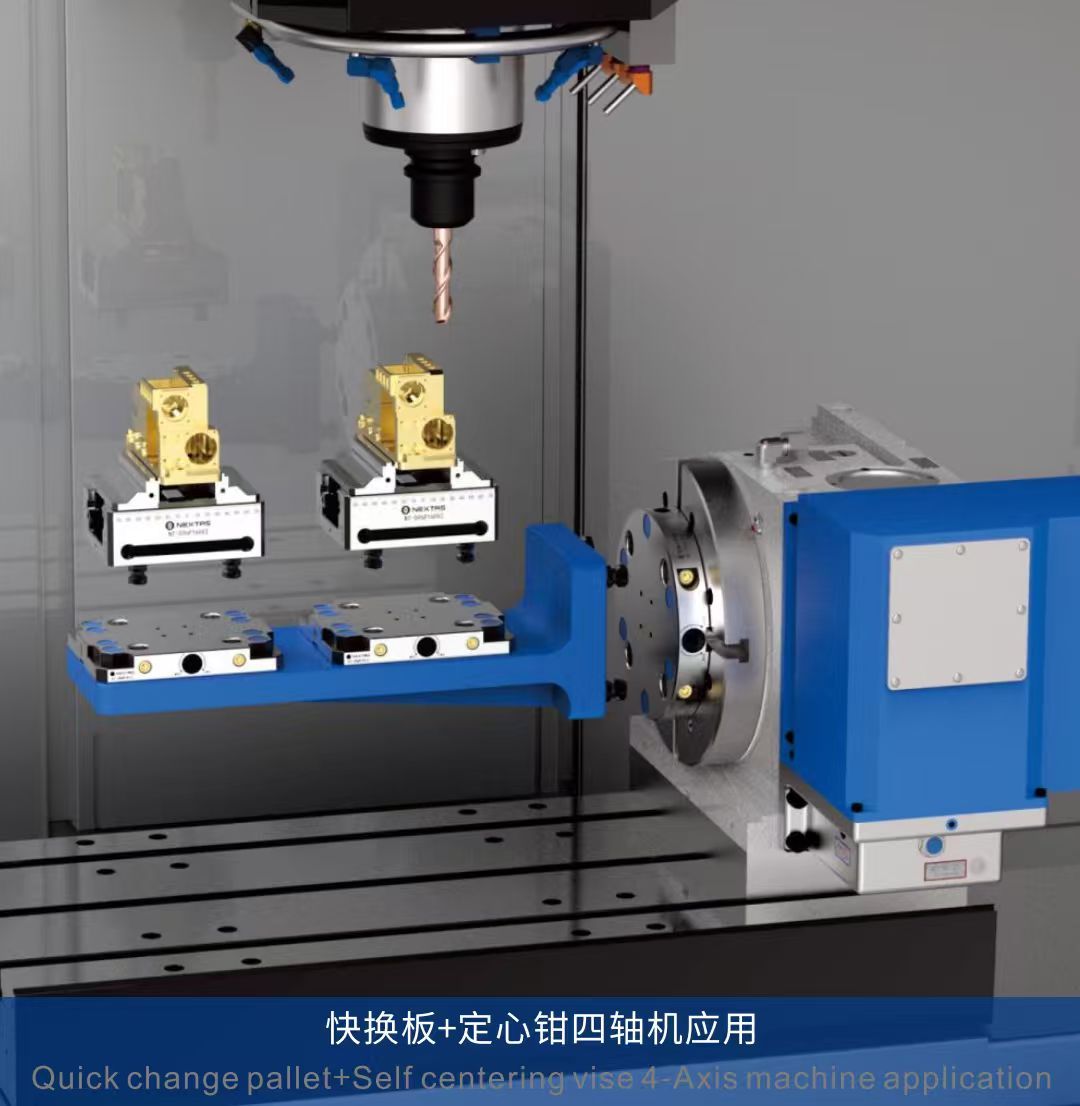
What a Self-Centering Vise Changes in Daily Production

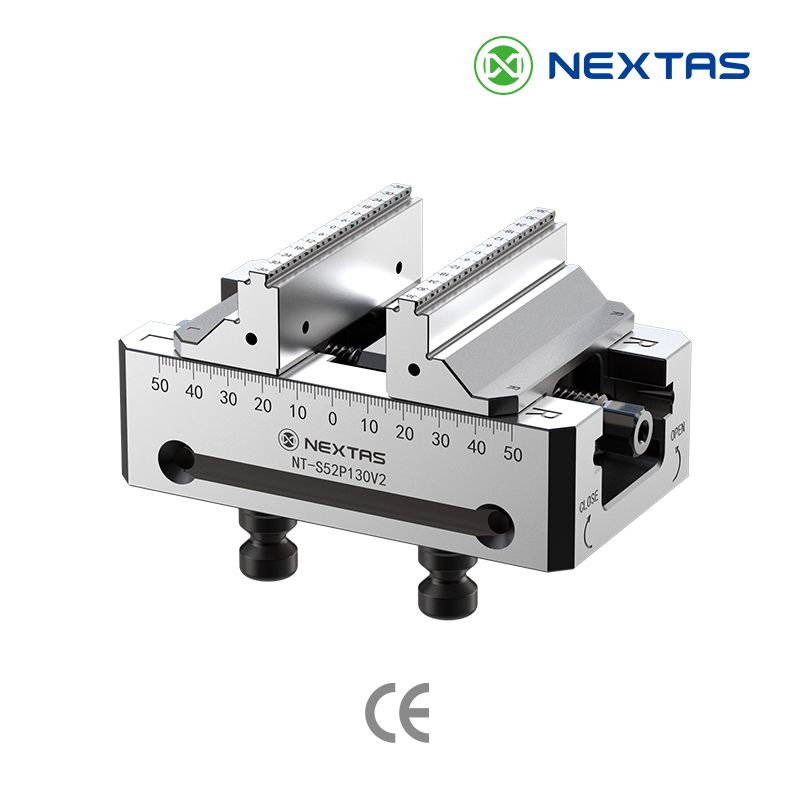
A self-centering vise improves the process because both jaws move symmetrically toward the workpiece. That creates a more predictable centerline return and reduces dependence on operator technique. In the Nextas Tech catalogue, the self-centering vise family is described with repeat positioning accuracy below 0.02 mm, hardened stainless steel construction, and model families built around 52 mm and 96 mm spigot spacing—details that matter when shops want repeatable setups across different machine sizes.

In practical terms, the workflow becomes simpler:

  • The part datum is easier to reproduce across batches.
  • Jaw changes and clamping range adjustments become more standardized.
  • Compact and larger workpieces can be matched to the right vise size without changing the entire setup philosophy.
  • Operators spend less time proving the setup and more time running parts.
A close-up of the internal mechanics of the Nextas Tech Self-Centering Vise, showing the precision self-centering mechanism.
A self-centering vise closing symmetrically on a part.

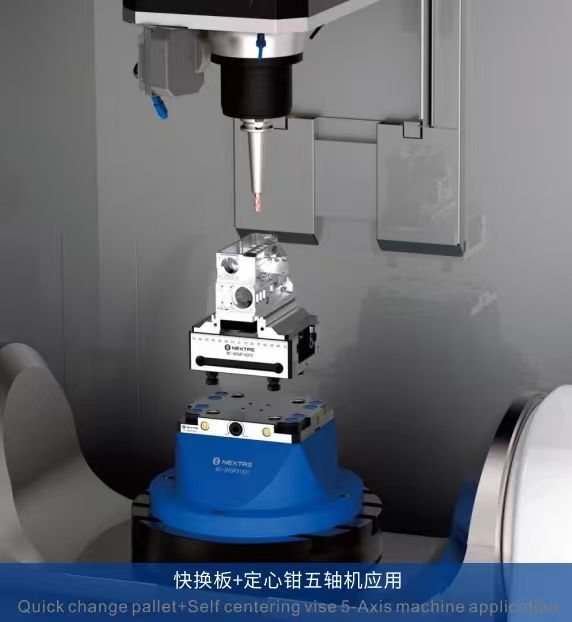
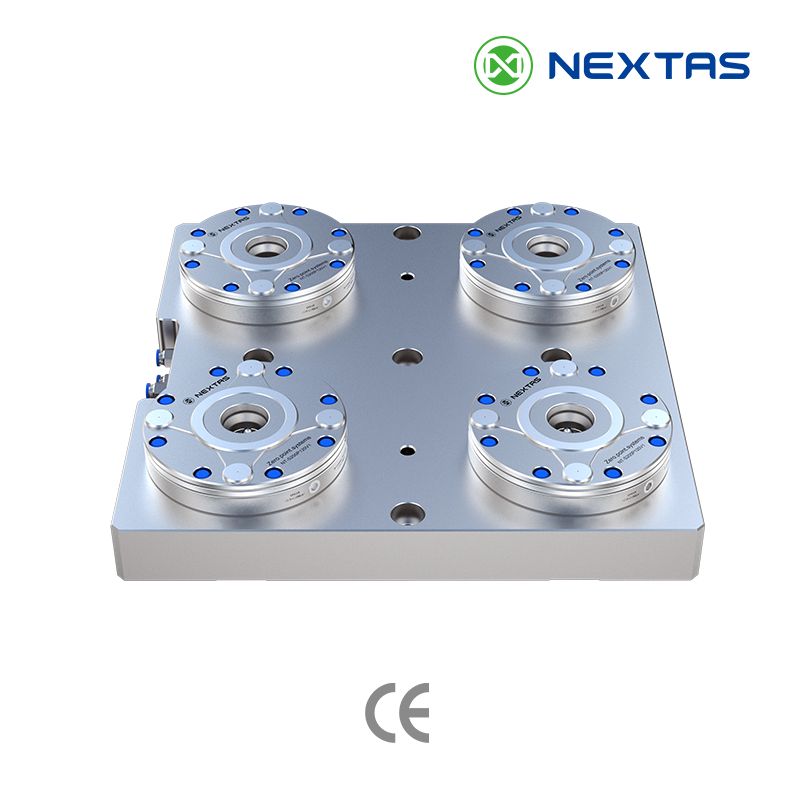
When Pairing with a Zero-Point System Delivers the Fastest ROI

The fastest payback usually appears when the vise is not treated as a standalone component, but as part of a repeatable module. If a shop already removes vises between jobs, preloads parts offline, or wants to move proven setups from one machine to another, pairing the self-centering vise with a zero-point clamping plate changes the economics.

Instead of re-indicating every time, the whole vise-and-part package can return to a known machine position. That reduces non-cutting time, simplifies operator training, and makes later automation easier to add. This matters even more in high-mix / low-volume production, where changeover frequency—not raw cycle time—is often the real capacity limiter.

Repeat family jobs
Typical pain point
Offsets and centering rebuilt too often
Why zero-point pairing helps
Returns the whole workholding package to the same machine reference faster.
Multi-machine production
Typical pain point
Setup logic differs by machine or operator
Why zero-point pairing helps
Standard interfaces make transfer and training easier.
Automation roadmap
Typical pain point
Manual clamping remains the bottleneck
Why zero-point pairing helps
Creates a modular base for robotic loading or unattended operation.

Best-Fit Machines, Part Families, and Upgrade Paths

Not every shop needs the same self-centering vise size or workflow. Smaller 52 mm interface models often make sense for compact parts, lighter setups, and dense fixture layouts. Larger 96 mm interface models are better suited for bigger parts, higher clamping force, and more demanding production environments. The Nextas Tech catalogue lists 14,000 N clamping force for the 52-series and 20,000 N for the 96-series, which is useful when comparing whether your current bottleneck is grip, rigidity, or simply changeover efficiency.

Shops usually get the best result by matching the upgrade path to the real production constraint:

  • 3-axis shops often win first on setup repeatability and operator consistency.
  • 4-axis and 5-axis users gain more from accessibility, repeatable centering, and modular transfer between fixtures.
  • High-mix production gets the biggest payoff from standardizing the base interface early.
A professional product shot of the Nextas Tech Self-Centering Vise, highlighting its solid and durable design.
The vise body and clamping mechanism.

How to Estimate ROI Before You Buy

A useful ROI estimate does not need to be complicated. Start with four numbers:

  1. Average setup/changeover time per job
  2. How many changeovers happen per week
  3. Hourly machine cost plus setup labor cost
  4. How much first-part proving time is tied to centering and jaw reset work

Then compare your current method against a workflow where centering is standardized and the vise can return to a repeatable position. Even small reductions add up quickly. Saving 10–15 minutes on repeat changeovers across several machines can recover many hours per month without touching cycle time at all. And when scrap, rework, and easier operator handover are included, the case often becomes stronger than a pure labor calculation suggests.

If you are quoting a new project or reviewing an upgrade, send the machine model, material, blank size range, and expected changeover frequency. That is usually enough to judge whether a self-centering vise alone is the right move, or whether a self-centering vise plus zero-point system will pay back faster.


Free Resource

Get the free workholding selection guide

Send your work email — we'll send the PDF selection guide + a 1-page workholding checklist within 1 business day. No spam, no obligation.

Reply within 1 business day · No spam · Data used for your enquiry only

Comparison, Selection & Cost Guide (Quick Tables)

Use the quick tables below to compare where a self-centering vise alone is enough, where zero-point compatibility adds real ROI, and which setup habits usually keep shops from seeing the full benefit.

Quick comparison: common workholding options

Zero-point system / zero-point clamping plate
Best for
Frequent part changes, multi-part families, modular setups
Strengths
Fast repeatable locating, scalable, automation-ready
Watch-outs
Needs clean interfaces; plan for chip control
Typical changeover
30–120 sec
Pneumatic vise
Best for
High mix + unattended runs where cycle time matters
Strengths
Stable clamping force, easy automation, consistent loading
Watch-outs
Air quality + pressure stability; safety interlocks
Typical changeover
1–3 min
Self-centering vise
Best for
Symmetric parts, 5-axis access, quick centering
Strengths
Centers fast, reduces setup errors, good for 5-axis
Watch-outs
Jaw travel limits; verify part envelope
Typical changeover
1–5 min
Self-Centering Vise + Zero-Point Clamping System
Best for
5-axis access + concentricity-sensitive parts
Strengths
Fast centering, less probing, repeatable swaps
Watch-outs
Check jaw travel/collisions; keep datums clean
Typical changeover
30–90 sec
Hydraulic fixture
Best for
High-volume or high-clamp-force machining
Strengths
Strong & stable, great for tight tolerances
Watch-outs
Higher upfront cost; maintenance & leak checks
Typical changeover
5–20 min
Custom dedicated fixture / jig
Best for
One part, very stable process, repeat production
Strengths
Max stability, lowest unit cost at scale
Watch-outs
Slow to change; redesign needed for new parts
Typical changeover
10–60 min
Pallet changer
Best for
Parallel setup + spindle utilization gains
Strengths
Setup off-machine, better OEE, easier lights-out
Watch-outs
Needs process discipline + pallet standards
Typical changeover
Varies (2–10 min off-machine)
FMS / pallet pool (automation)
Best for
Many SKUs + long unattended windows
Strengths
Best throughput + scheduling flexibility
Watch-outs
Highest system complexity; needs planning
Typical changeover
N/A (system-level)

Fast selection: match your scenario

Need quick centering on 5-axis (minimal probing)
Recommended setup
Self-Centering Vise + zero-point base
Notes
Preset jaw stop; simulate envelope before cutting.
1–10 pcs, frequent changeovers, < 0.02 mm targets
Recommended setup
Zero-point system + modular base
Notes
Build a “standardized base” and swap top tooling.
10–200 pcs, operator present, mixed geometries
Recommended setup
Self-centering vise or pneumatic vise + soft jaws
Notes
Add quick jaw change + pre-set stops.
200+ pcs, high clamp force, stable part family
Recommended setup
Hydraulic fixture or dedicated fixture
Notes
Optimize for cycle time + tool access.
Lights-out / unmanned shift (2–8+ hours)
Recommended setup
Pneumatic vise + pallet changer or FMS
Notes
Prioritize sensing, chip evacuation, and fail-safe clamping.

What affects price (and how to control it)

Extra jaw sets / soft jaws
Why it changes price
Custom jaws improve grip, access, and balance
How to reduce cost
Standardize jaw blanks; reuse proven jaw profiles.
Repeatability requirement (e.g., ≤0.01 mm)
Why it changes price
Tighter repeatability needs higher precision interfaces and QC
How to reduce cost
Standardize datums; use proven modules; avoid over-spec.
Changeover frequency
Why it changes price
More swaps reward quick-change systems (ROI grows fast)
How to reduce cost
Measure setup time; prioritize the biggest bottleneck.
Automation level (sensors, interlocks, palletization)
Why it changes price
Adds hardware + integration time
How to reduce cost
Start with one cell; reuse components across machines.
Workpiece size & material
Why it changes price
Large/heavy parts need stronger clamping + bigger bases
How to reduce cost
Use modular plates; right-size the fixture footprint.
Engineering time (custom vs modular)
Why it changes price
Custom design drives NRE cost
How to reduce cost
Prefer modular stacks; keep custom parts minimal.

Common mistakes (and quick fixes)

Over-tightening thin walls

Symptom: Part distortion / out-of-round

Fix: Use step jaws/supports; lower clamp force.

Not checking clearance &amp; jaw travel

Symptom: Collision or limited tool access

Fix: Verify envelope; use risers/short jaws.

Skipping chip control on locating surfaces

Symptom: Repeatability drifts; “mystery” setup errors

Fix: Add air blast, covers, and a cleaning routine.

Over-clamping thin parts

Symptom: Warping, chatter, tolerance issues

Fix: Use proper jaw support + controlled clamping force.

No standard datum / pallet standard

Symptom: Every setup becomes a one-off

Fix: Define a shop standard (datums, pallet, bolt pattern).

Choosing by lowest price only

Symptom: Higher labor cost + downtime

Fix: Evaluate total cost: labor, scrap, changeover time.

Want a recommendation for your parts? Send us your machine model, material, and tolerance target — we’ll suggest a practical setup.

Frequently Asked Questions (FAQ)

When does a self-centering vise usually pay for itself?

It usually pays back fastest in shops that run many short or medium batches, repeat part families, or frequent operator handoffs. The clearest ROI comes from reduced indicating time, fewer setup mistakes, and faster first-part approval rather than from clamp force alone.

Do I need a zero-point system on day one?

Not always. Many shops start with the vise first, prove the setup savings, and then add zero-point pallets when machine-to-machine transfers or repeated fixture swaps become the next bottleneck.

What numbers should I track before and after the upgrade?

Track jaw-change time, indicating time, first-part approval time, scrap during setup, and how long it takes a second operator to repeat the same job. Those numbers show ROI much more clearly than focusing only on spindle uptime.

Keep exploring

Keep reading with closely matched guides on vise selection, repeatability, jaw strategy and multi-face machining workflow.

Browse all articles →

Match the hardware

These product pages are the most direct next step if you are comparing vise hardware, quick-change compatibility and real production fit.

Browse all products →

Need help with 5-axis workholding?

Share your part size, material, and tool-access requirements. We’ll help compare self-centering, dovetail, and zero-point-compatible setups for stable multi-face machining.

Discuss Your 5-Axis Setup →