Blog

How a Self-Centering Vise Improves Setup Accuracy & Repeatability

A troubleshooting guide for shops chasing tolerance drift, unstable first parts, and batch-to-batch inconsistency before blaming the machine or the cutting tools.

Published on July 10, 20258 min read
Table of contents
High-Precision 5-Axis Self-Centering Vise
Featured Product

High-Precision 5-Axis Self-Centering Vise

Dual-jaw self-centering vise for 5-axis machining with low backlash, hardened jaws and 52 / 96 mm zero-point compatibility — fast manual or pneumatic clamping.

  • Self-centering, ±0.01 mm typical accuracy
  • Hardened jaws + adjustable backlash
  • 52 mm & 96 mm zero-point compatible
A professional product shot of the Nextas Tech Self-Centering Vise, showcasing its precise structure and design.
The Nextas Tech self-centering vise, set up for a repeatable centerline.

When a shop starts seeing drifting dimensions, unstable first parts, or rework that appears only after re-clamping, the machine is often blamed first. In reality, many precision problems begin in the workholding chain: poor jaw seating, inconsistent centering, chip contamination on locating surfaces, weak support under the cut, or an operator rebuilding the datum differently every time.

A self-centering vise helps because both jaws move symmetrically, so the part returns to a consistent centerline instead of relying on a one-sided push-and-indicate routine. For shops running repeat jobs, mixed part families, or multiple operators, that consistency is often what separates predictable production from tolerance drift that only shows up after the second or third batch.

Where Repeatability Is Usually Lost in Daily Machining

Repeatability is rarely lost in one dramatic event. It slips away through small decisions that accumulate across the shift: a jaw is swapped but not re-seated cleanly, the stock sits slightly differently because a burr is left on a locating face, or the part is clamped with too little support under an aggressive roughing toolpath. Each event looks minor on its own, but together they create a setup that behaves differently from lot to lot.

That is why troubleshooting should start with the setup sequence rather than with offsets alone. Ask whether the error moves after the same part is unclamped and re-clamped. Ask whether the first part after changeover needs more correction than the fifth. Ask whether two operators get the same result from the same raw blank. Those questions usually tell you whether the problem is being generated by the machine, the process, or the workholding method.

  • Jaw contact: uneven contact can tilt or twist the workpiece under load.
  • Datum recreation: one-sided clamping often forces operators to rebuild the centerline after every swap.
  • Support under the cut: thin walls and tall parts need support strategy, not just more force.
  • Chip control: locating faces and interfaces must stay clean if repeatability is the goal.
A close-up of the Nextas Tech Self-Centering Vise jaws, highlighting the precision-machined surface.
Close-up of the self-centering vise jaws and their ground contact faces.

A Shop-Floor Diagnostic Checklist Before You Touch Offsets

Before changing tools, probing logic, or machine compensation, run a short workholding audit. Re-clamp the same part twice. Clean and inspect the jaw seats. Verify whether the part is bottoming correctly or hanging on stock variation. Check whether clamp force is solving the problem or hiding it. Shops often save hours by diagnosing those basics first.

Re-clamp repeat test
What to look for
Does the part come back to the same centerline and Z support condition?
Typical action
Test the same blank 2–3 times before adjusting offsets.
Jaw seating
What to look for
Chips, burrs, worn contact edges, or loose jaw hardware.
Typical action
Clean, torque correctly, and re-seat the jaw set.
Support under cut
What to look for
Tall, thin, or interrupted parts moving under roughing load.
Typical action
Add support, adjust jaw profile, or reduce unsupported height.
Datum strategy
What to look for
Is the datum rebuilt manually after every swap?
Typical action
Standardize on a self-centering or zero-point based setup.

How Vise Construction, Jaw Support, and Grinding Influence Accuracy

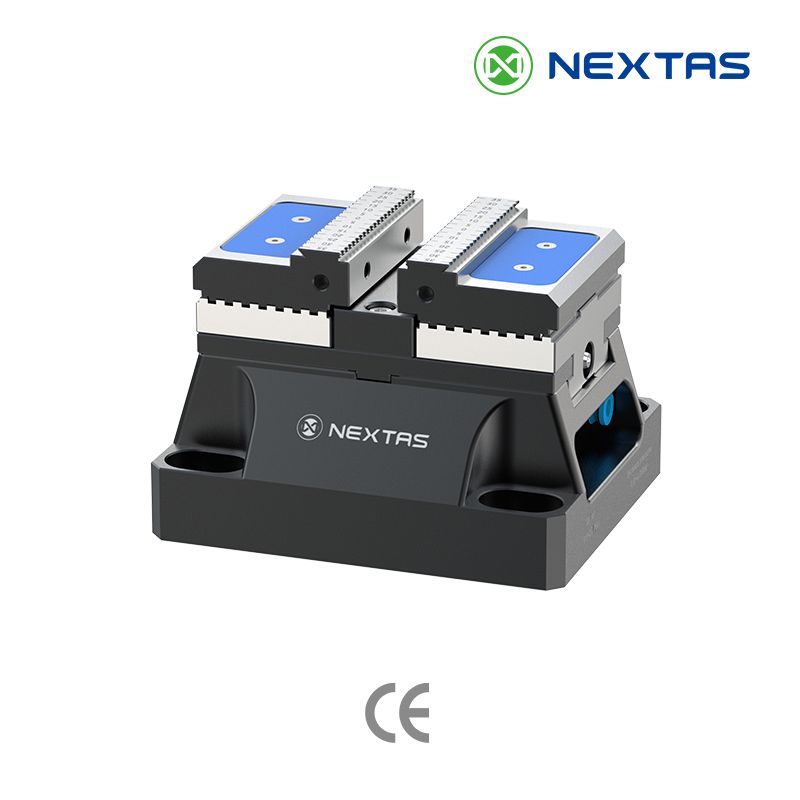
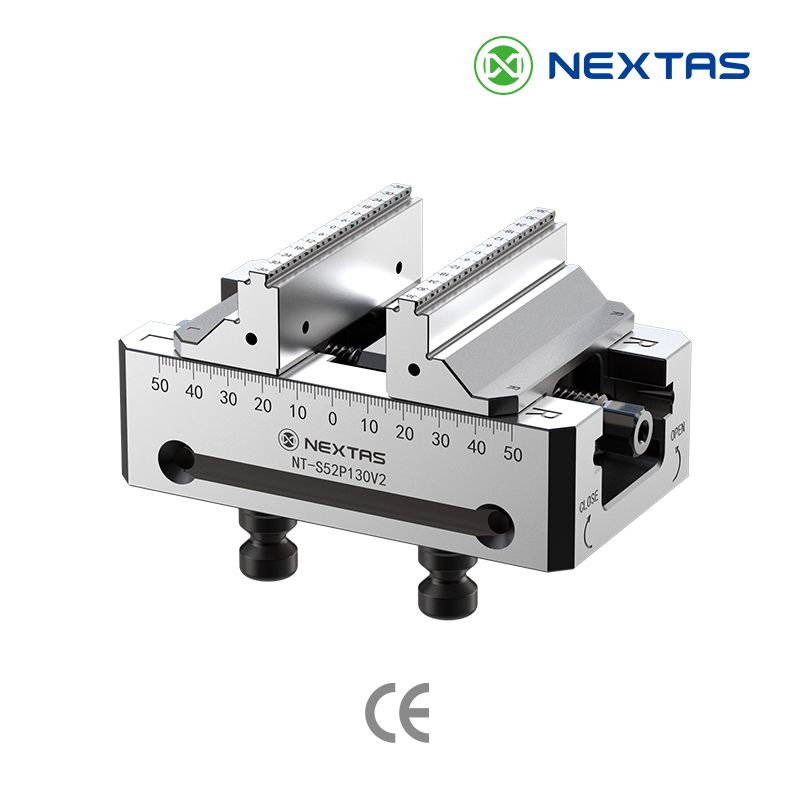
Catalog repeatability numbers only matter when the whole structure supports them. On the Nextas Tech self-centering vise platform, the practical value comes from the combination of hardened stainless steel, precision-ground critical surfaces, and a symmetric clamping mechanism built for repeat positioning. According to the current Nextas Tech product catalogue, the self-centering vise line is built around repeat positioning accuracy below 0.02 mm, hardened stainless steel construction, and models arranged around 52 mm and 96 mm spigot spacing for different machine sizes.

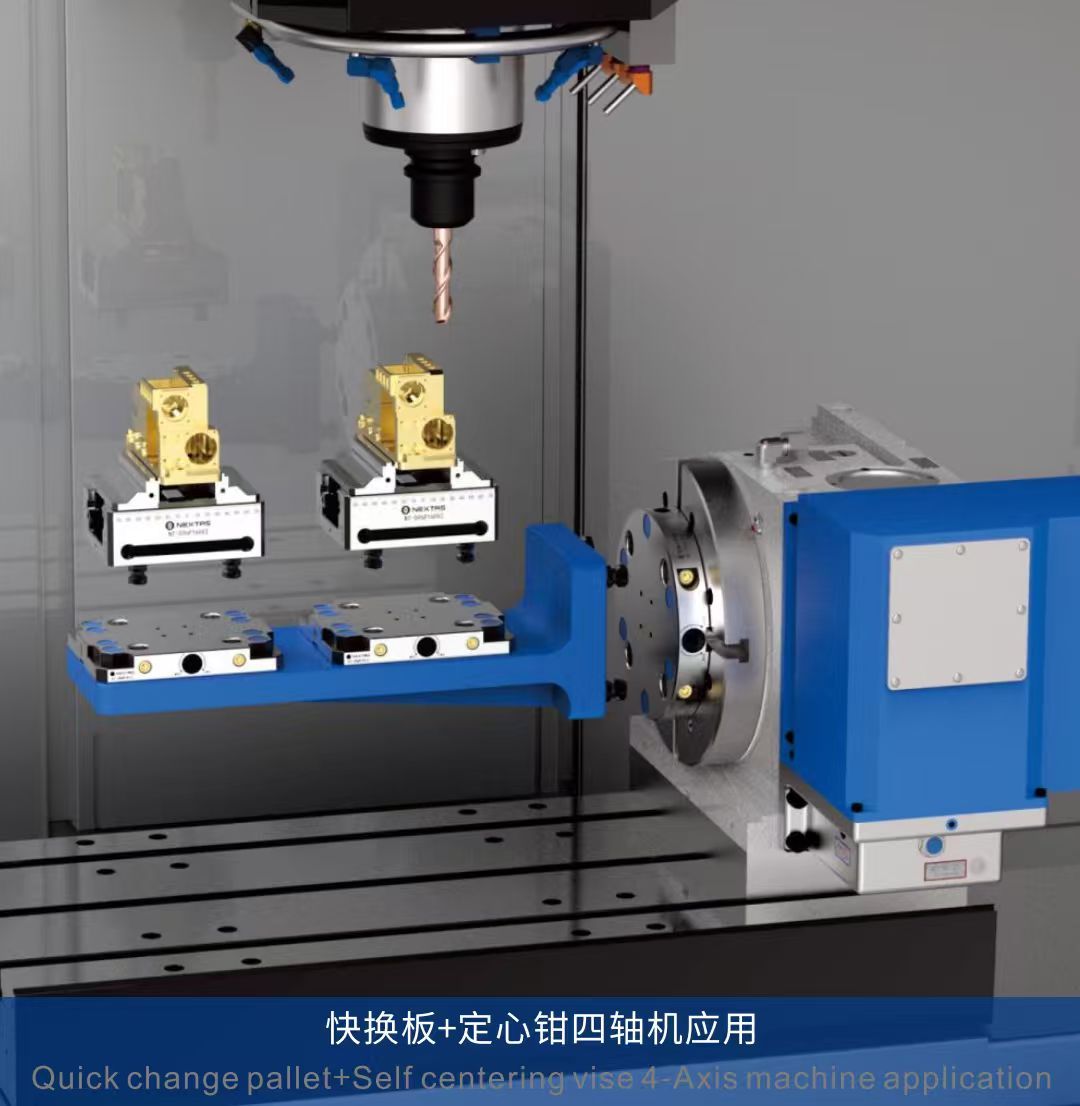
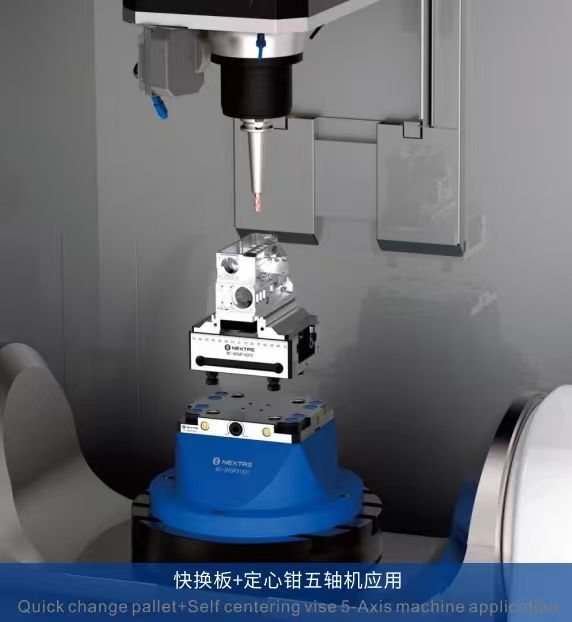
In the shop, those details matter because rigid, precision-ground contact surfaces reduce micro-movement at the jaw interface. Better parallelism means less induced error when the part is clamped. Better body rigidity means less tendency for the setup to behave differently during roughing than during finishing. And when the same base logic can be reused across compact and larger vise footprints, it becomes easier to standardize setups across 3-axis, 4-axis, and 5-axis machines instead of reinventing them.

An image showing the solid construction of the Nextas Tech vise.
The vise body, machined from hardened stainless steel.
The Nextas Tech Self-Centering Vise viewed from another angle.
The same self-centering vise viewed from another angle.

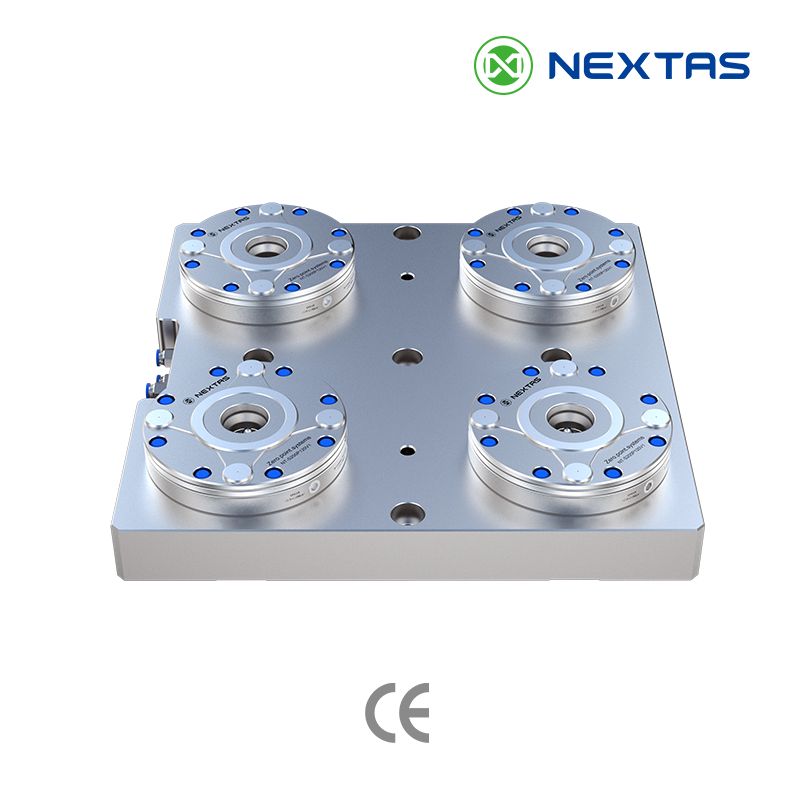
When to Pair a Self-Centering Vise with Zero-Point Clamping

A self-centering vise improves repeatability at the part level. A zero-point clamping plate improves repeatability at the setup level. If your shop removes vises between jobs, swaps fixtures offline, or wants to move a proven setup between machines, combining the two usually delivers the fastest operational improvement.

This combination makes the most sense when:

  • Changeovers happen often: you save time not only on clamping the part, but on returning the whole vise-and-part package to a known machine position.
  • Multiple machines share the same workholding standard: standard interfaces make transfer and scaling easier.
  • Automation is planned: palletized, repeatable modules are easier to integrate into robotic or unattended workflows.
A detailed view of the vise's internal mechanical structure.
Cutaway view of the vise's internal clamping mechanism.

What to Send When You Ask for a Fixture Recommendation

If you want a useful engineering recommendation instead of a generic product pitch, send the job context. A good supplier needs more than just the raw stock size.

  • Machine type and axis configuration
  • Workpiece material and approximate blank size
  • Main tolerance risk: flatness, centerline, parallelism, distortion, or re-clamp repeatability
  • Batch size and changeover frequency
  • If you want manual loading only or future automation compatibility

With that information, it becomes much easier to decide whether a compact self-centering vise, a larger 96 mm-base model, a zero-point plate stack, or a more customized fixture approach is the right next step.


Free Resource

Get the free workholding selection guide

Send your work email — we'll send the PDF selection guide + a 1-page workholding checklist within 1 business day. No spam, no obligation.

Reply within 1 business day · No spam · Data used for your enquiry only

Comparison, Selection & Cost Guide (Quick Tables)

Use the quick tables below to separate machine problems from workholding problems, compare accuracy-related cost drivers, and identify which setup mistakes usually create repeatability complaints.

Quick comparison: common workholding options

Zero-point system / zero-point clamping plate
Best for
Frequent part changes, multi-part families, modular setups
Strengths
Fast repeatable locating, scalable, automation-ready
Watch-outs
Needs clean interfaces; plan for chip control
Typical changeover
30–120 sec
Pneumatic vise
Best for
High mix + unattended runs where cycle time matters
Strengths
Stable clamping force, easy automation, consistent loading
Watch-outs
Air quality + pressure stability; safety interlocks
Typical changeover
1–3 min
Precision vise + Zero-Point Clamping System
Best for
General CNC work where repeatable setups matter
Strengths
Good rigidity + faster swaps when standardized
Watch-outs
Verify height/clearance; keep interfaces clean
Typical changeover
1–5 min
Self-centering vise
Best for
Symmetric parts, 5-axis access, quick centering
Strengths
Centers fast, reduces setup errors, good for 5-axis
Watch-outs
Jaw travel limits; verify part envelope
Typical changeover
1–5 min
Hydraulic fixture
Best for
High-volume or high-clamp-force machining
Strengths
Strong & stable, great for tight tolerances
Watch-outs
Higher upfront cost; maintenance & leak checks
Typical changeover
5–20 min
Custom dedicated fixture / jig
Best for
One part, very stable process, repeat production
Strengths
Max stability, lowest unit cost at scale
Watch-outs
Slow to change; redesign needed for new parts
Typical changeover
10–60 min
Pallet changer
Best for
Parallel setup + spindle utilization gains
Strengths
Setup off-machine, better OEE, easier lights-out
Watch-outs
Needs process discipline + pallet standards
Typical changeover
Varies (2–10 min off-machine)
FMS / pallet pool (automation)
Best for
Many SKUs + long unattended windows
Strengths
Best throughput + scheduling flexibility
Watch-outs
Highest system complexity; needs planning
Typical changeover
N/A (system-level)

Fast selection: match your scenario

Many small batches; want faster setups
Recommended setup
Precision vise + zero-point base/pallet
Notes
Standardize vise height and stop positions; reduce touching-off.
1–10 pcs, frequent changeovers, < 0.02 mm targets
Recommended setup
Zero-point system + modular base
Notes
Build a “standardized base” and swap top tooling.
10–200 pcs, operator present, mixed geometries
Recommended setup
Self-centering vise or pneumatic vise + soft jaws
Notes
Add quick jaw change + pre-set stops.
200+ pcs, high clamp force, stable part family
Recommended setup
Hydraulic fixture or dedicated fixture
Notes
Optimize for cycle time + tool access.
Lights-out / unmanned shift (2–8+ hours)
Recommended setup
Pneumatic vise + pallet changer or FMS
Notes
Prioritize sensing, chip evacuation, and fail-safe clamping.

What affects price (and how to control it)

Extra base plates / pallets
Why it changes price
Standard bases reduce setup time but add hardware cost
How to reduce cost
Share bases across vises; start with 2–3 pallets.
Repeatability requirement (e.g., ≤0.01 mm)
Why it changes price
Tighter repeatability needs higher precision interfaces and QC
How to reduce cost
Standardize datums; use proven modules; avoid over-spec.
Changeover frequency
Why it changes price
More swaps reward quick-change systems (ROI grows fast)
How to reduce cost
Measure setup time; prioritize the biggest bottleneck.
Automation level (sensors, interlocks, palletization)
Why it changes price
Adds hardware + integration time
How to reduce cost
Start with one cell; reuse components across machines.
Workpiece size & material
Why it changes price
Large/heavy parts need stronger clamping + bigger bases
How to reduce cost
Use modular plates; right-size the fixture footprint.
Engineering time (custom vs modular)
Why it changes price
Custom design drives NRE cost
How to reduce cost
Prefer modular stacks; keep custom parts minimal.

Common mistakes (and quick fixes)

Different setups on every job

Symptom: Long setup time; inconsistent results

Fix: Create a standard base + checklist.

No collision check

Symptom: Tool limits or crashes

Fix: Simulate, use shorter tooling, verify clamps.

Skipping chip control on locating surfaces

Symptom: Repeatability drifts; “mystery” setup errors

Fix: Add air blast, covers, and a cleaning routine.

Over-clamping thin parts

Symptom: Warping, chatter, tolerance issues

Fix: Use proper jaw support + controlled clamping force.

No standard datum / pallet standard

Symptom: Every setup becomes a one-off

Fix: Define a shop standard (datums, pallet, bolt pattern).

Choosing by lowest price only

Symptom: Higher labor cost + downtime

Fix: Evaluate total cost: labor, scrap, changeover time.

Want a recommendation for your parts? Send us your machine model, material, and tolerance target — we’ll suggest a practical setup.

Frequently Asked Questions

How do I know whether the issue is workholding or the machine?

Check whether the error changes after re-clamping the same part or when a second operator repeats the setup. If the deviation moves with the setup, the first suspect is usually workholding, datum control, or jaw support rather than the spindle itself.

Can a self-centering vise really reduce scrap on repeat jobs?

Yes — especially when scrap comes from small setup differences between batches or operators. The vise does not replace process control, but it can remove one major source of variation by returning the part to a more consistent centerline and clamping condition.

What should I inspect first on a precision vise?

Start with jaw condition, jaw seating, chip contamination on locating surfaces, clamp-force settings, and whether the part has enough support under the cut. Those are often quicker wins than changing tools or offsets blindly.

Keep exploring

Keep reading with closely matched guides on vise selection, repeatability, jaw strategy and multi-face machining workflow.

Browse all articles →

Match the hardware

These product pages are the most direct next step if you are comparing vise hardware, quick-change compatibility and real production fit.

Browse all products →

Need help with 5-axis workholding?

Share your part size, material, and tool-access requirements. We’ll help compare self-centering, dovetail, and zero-point-compatible setups for stable multi-face machining.

Discuss Your 5-Axis Setup →